So by now the new 1:25 Batmobile model from Polar Lights/Round II has been all over eBay and many places are selling them for between $20 and $30. You can also order them at the manufacturer’s website HERE. As I mentioned earlier in the video first look, this is is an exceptionally well-done kit, especially for a snap version. You can conceivably put this kit together, with or without your kid (I recommend WITH), in an evening. If you want to apply a massive amount of detailing, you can stretch it into a weekend.
I’m not going to go crazy on this one, as I’ll hold that back for the promised, upcoming glue-kit because of the opening trunk and hood aspects of that version. But I will do a middle of the road build/paint with my son and report about the assembly.
As far as the parts and accuracy of the details go – everything here is excellent. With two, fairly important (but not insurmountable) exceptions:
1. The Beacon*
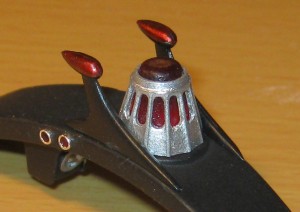
As far as the beacon goes, it’s fairly crudely detailed and even stripping the chrome won’t make it that much less toy-like. Not as bad as we had anticipated, but not as nice as the rest of the parts for sure. I’ve got access to some amazingly nice and highly detailed beacons in the correct scale designed by our good friend Mit in Australia. I’ve got it in machined aluminum and in resin versions. It’s a 3-piece part that includes the inner red beacon and the top. As you can see, it can totally change the realism level of the model.
2. The Figures*
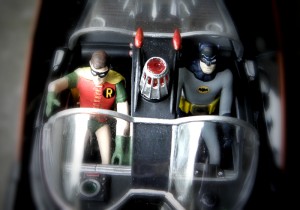
In an ironic, probably unintentional nod to the original Aurora 1966 Batmobile model kit, The figures are very comic-booky and unrealistic. I think the guys at PL were bummed about how they turned out. But including them will make loads of kid builders ecstatic. They aren’t acceptable for our use and so we’re working on a set of much more realistic figures modified from 2 separate original sculpts by Scott Kapellusch. Here they are in their current state.

So we’re going to be putting the snap kit together this weekend and will take shots and hopefully video as we go. Stay tuned for the report here.
(For more information about anything we show or feature here: 1) Subscribe to our mailing list (above in the nav bar) and/or 2) Contact us and we’ll let you know if and when they’ll be available and from who.)


shane
June 24, 2011 at 9:30 amquick question…will it be possible to use the pre painted body of the snap kit with the glue kit if I want to avoid spraying the body?
admin
June 24, 2011 at 12:09 pmGreat question Shane. And one that I’ve been thinking about too. Obviously the hood and trunk lids won’t be cut out, you’d have to carefully do that yourself or just blow off having them accessible. I think we won’t know for sure how that will work until we get the glue kit. The mounting posts on the bottom seem a bit different, but it should be something that can be made to work. I’ll check with our contact at PL.
shane
June 24, 2011 at 12:26 pmCool thanks..really enjoying the snap kit so far…looking forward to your review….
Kevin
June 24, 2011 at 2:08 pmThe mounting pins on the snap kit are larger than on the glue, so no.
Kevin
June 25, 2011 at 10:46 pmAt least that’s what I suspect from the pics i’ve seen. I’ll let you know for certain when my snap kit arrives next week.
shane
June 27, 2011 at 12:34 pmThought you might like to see my finished model..I think it looks cool for a snap kit! Can’t wait to tackle the glue kit.
http://img857.imageshack.us/img857/2610/mybatmobile.jpg
shane
June 27, 2011 at 2:16 pmCool thanks Kevin…
Kevin
June 30, 2011 at 11:46 amShane,
Just recieved my snap kit. It appears my earlier assumption WAS wrong. While the snap together kit’s chassis would need slight modification to fit under the glue body, it appears the glue chassis will fit nicely under the snap body.
shane
June 30, 2011 at 3:44 pmreally..mmhh interesting…I have another snap kit on the way to me..going to give that extra attention…might just make the glue it as it stands…cheers